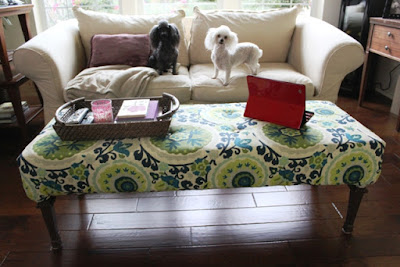
I’ve been drooling over the fashionable ottomans displayed in almost every home and furniture magazine, but their price tag left a lot to be desired. Luckily, Pinterest is a great go-to place to find DIY…anything. After reading several blogs about turning a coffee table into an ottoman, I decided to jump on in and make one for myself. Let's get a little crafty!
Tools you need for the project:
Sturdy coffee table
Sanding block or sanding sheets
Paint (if you want to redo the legs)
Foam
Electric knife or serrated knife
Ruler
Sharpie marker
Batting/Dacron
Upholstery Spray Adhesive
Drill
Scissors
Staple gun
Fabric
Button kit (if you are tufting the ottoman)
The first step is to decide what you want to do to the legs of your ottoman. Unless you are leaving them as is, you will most likely have to sand it down. I took a sheet of fine sand paper and took the sheen off the four legs. In some places I took it down to the bare wood.
I contemplated painting them the same green from the kitchen (adjacent to living room), and I also thought about retaining the legs a dark espresso color.
Ultimately I took the quick and easy route and spray painted them a dark brown. After a few light coats of spray paint, I sealed it with a clear matte spray paint.
While the paint dried on the table legs, I started work on the foam. I used a 3 inch thick foam piece that I purchased from Joann Fabric. The foam turned out to be the most expensive piece of this project. Thankfully I had a 50% off coupon to use.
The foam needs to be cut the exact same size as your table top. Measure twice and cut once! I used a long straight board to help me make the sharpie mark down the side of the foam where I needed to trim.
Taking a cue from the cutting table at Joann, I used an electric knife to saw off the pieces I didn’t need. It was super easy and fun.
Next, I needed to mark where my tufting and buttons were going to go. I wanted two rows, and through measuring and marking determined I wanted the rows at 6 inches in on each side. The next step required the use of the calculator app on my iPhone. My ottoman is 54 inches long and I wanted two rows of four buttons to run the length so I divide 54 by 5 and get 10.8. Using my ruler I marked every 10.8 inches and there you go… now I know where to put holes in the foam.
I first tried to drill holes in the foam but this did not work AT ALL. A pair of utility scissors worked perfectly. Using the scissors I easily cut an X where each button hole was going.
Repeat the measuring and marking on the table, and this time the drill worked great for making the holes for me. Put the foam on top and recheck to make sure the holes line up correctly. This is important, because we are gluing next and then tufting.
The professional grade upholstery spray adhesive is NO JOKE. This sticky stuff squirts out of the can kind of like silly string, but more like I imagine Spider Man doing. I sprayed it on the table and on the foam, waiting about one minute and then carefully stuck the two together making sure my corners were lined up perfectly.
This is when I realized that I needed some foam below my table lip as well. I tested with the batting, and it really needed to be more full. Luckily, I had just enough excess foam that I removed earlier to cut into smaller pieces to fit under the lip. Bonus, I got to use the electric knife again.
This picture shows the upholstery glue and all its sticky glory.
All four sides now have foam.
The next step is to fit the batting. Batting is super cheap and knowing what I know now, I would have purchased double and made two layers since this adds the “plush” to the ottoman. You want to smooth it around all four sides, but not pull so tightly that it changes the shape of your foam.
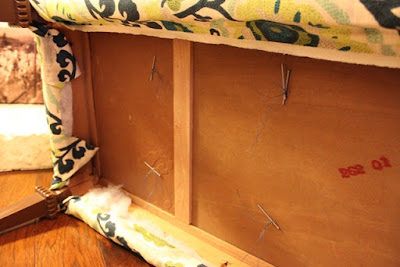
Smooth it around and allow enough to fold underneath so we can use our staple gun and secure it to the underside.
I’ve now moved the project inside and repurposed TV trays as saw horses so I can easily get underneath the ottoman for the final steps.
Pinch the batting at the corners and cut straight down to give a clean corner.
Continue smoothing and stapling all the way around.
Don't worry about what it looks like on the underside.
Now the batting is completely covering the foam and neatly tucked and secured to the underside of the ottoman.
The fabric. It called to me. Seriously, I was walking by and it reached out and slapped me in the face and told me that I had to buy it. For YEARS I have struggled with a color pallet for the living room. The kitchen is a bright grass green accented with black and white. The living room has been all neutrals, with the exception of a chaise lounge covered in fabric that is not me (anymore). It needs reupholstering too, but it’s not a job that I can take on.
This fabric however incorporates a touch of green which ties nicely with the kitchen, but introduces a new accent color, shades of blue. It’s perfect! I love the bold patter because it’s not too girly, it’s the right mix of modern and funky that I think Jim will like as well. (He’s seeing it for the first time right now on the blog…surprise!)
Before we pull and staple the fabric down and around the ottoman, we have to do the buttons and tufting. This was actually one of the more time consuming parts of the project. I have never used a button making kit, but it was very easy and I thought they look so “professional!”
Not sure of what type of thread I should use, I first tried jute which was too thick, then fabric cording, also too thick, then fishing line, which was too thin. Let me just tell you that this heavy duty nylon did the trick. Just to be sure, I doubled the thickness before sewing.
I found the extra long tufting needles at Joann’s also. Starting from underneath I threaded the needle up through the pre-made holes, through the foam hole and up through the fabric.
I added the matching button and then thread back down through my holes. The tighter you pull, the deeper your button will sink into the foam.
Here you can see what I did underneath. Some people use another plain button on the underside to hold the thread taunt. I’ve also seen people use pencils. I used big nails above the knots I tied under each button hole.
The last step is to pull the fabric around and staple securely to the underside. The corners are the most tricky part of this. I messed with them for a long time before determining to wrap it like a present and make hospital corners on both ends.
Total cost on this project was $120.
Total time for this project was 5 hours.
Here are some web pages that I found helpful:
http://www.spruceaustin.com/http://www.designsponge.com/
http://littlegreennotebook.blogspot.com/2009/03/make-ottoman-from-coffee-table.html


What a great idea! Looks wonderful. I've always wanted to do a headboard and you have made the project seem less daunting.
ReplyDeleteit turned out so cute! i love that fabric
ReplyDeleteI love the fabric you chose! I do however love vintage furniture and that coffee table was so pretty!
ReplyDeleteI can't wait to see it in person!
I love what you did to that table. The coffee table turned out into a simple yet very compelling one. The fabric you used complemented well with the color of the table. Anyway, I look forward to seeing more DIY projects from you.
ReplyDeleteContemporary Coffee Tables
That is cute! i love that fabric!
ReplyDeletecorner kitchen table
This comment has been removed by a blog administrator.
ReplyDeleteThis comment has been removed by a blog administrator.
ReplyDeleteThis comment has been removed by a blog administrator.
ReplyDeleteThis comment has been removed by a blog administrator.
ReplyDeleteWhy would you cover such a gorgeous coffee table!?
ReplyDeleteOh thank you. The table was my grandmother's and I do love it so! It wasn't my style, so I repurposed to fit in my living room.
DeleteBeautiful and thanks for sharing!!!
ReplyDeleteBeautiful and thanks for sharing!!!
ReplyDeleteThis comment has been removed by a blog administrator.
ReplyDeleteThat's great information. Thanks for sharing this blog. I did a search and found your blog and glowing review. It's been a big help! Thanx!
ReplyDeletesee more: toolsadvisors
Wow! The fabric is very suitable. I enjoy reading DIY projects. Thank your article! Please share with me your DIY projects. woodworkingtoolkit
ReplyDeleteI think that is a great addition to your living area and a great choice for the fabric, too. By the way, did you end up using any power tools for this project similar to the one here?
ReplyDelete