

Showing posts with label leftovers. Show all posts
Showing posts with label leftovers. Show all posts
Sunday, February 18, 2018
Menu of the Week #7


Thursday, December 30, 2010
Taco Stoup made with Leftovers

Do you ever clean out the fridge to find a tower of Tupperware containing bits of dinners past? My mother in law made a fantastic taco salad bar last weekend for the family and used ingredients you would expect to see (tomatoes, lettuce, beans, black olives) and some we were surprised we liked on our salad (pecans, shredded coconut, Frito's and nopalitos, which is cactus.) Jim and I luckily ended up with a good portion of the leftover pulled beef and the ground beef with onions, tomatoes and pinto beans.
I made quesadillas for Jim and I one night with the leftovers, and nachos as a snack later in the week. What I needed now was one really good recipe to repurpose all our leftovers and create one last fantastic meal. Enter Taco Stoup from stage left. That is not a typo, "stoup" is a cross between soup and stew. He's spicy, he's meaty, he's not quite a soup but not quite chile. You can eat this Taco Stoup in a bowl with a spoon, or scooped up with a tortilla, or spooned over tortilla chips, fritos or salad greens. This is a play on my original Taco Soup recipe, but I used what I had in the kitchen...and in this case, it just happened to be some fantastic mexican leftovers.

Ground Beef with Tomatoes, Onion and Pinto Beans
4 lbs ground beef
3 large onions, chopped
2 14 1/2 oz cans peeled tomatoes
2 15 oz cans tomato sauce
2 12 oz cans tomato puree
4 T chili powder
2 t cumin
1 t garlic powder
6 t salt
2 23 oz cans Ranch Style Beans (My mother in law used pinto beans.)
Directions:
Brown beef and onions, drain fat. Add remaining ingredients except beans and simmer for 1 to 1.5 hours. Add beans and heat through.

Pulled Beef
2-3 lb beef chuck, fat trimmed
3 T red wine vinegar
1 1/2 c beef broth
2 T chili powder
1 t ground cumin
Directions:
Cut roast into 3-4 chunks and place in slow cooker. Combine ingredients and pour over roast. Cook 7-8 hours. Final hour: remove beef and shred. Return to pan with juice, cover and cook another hour.
Serves 8-12
HWM Leftover Taco Stoup
Into a crock pot I scoop the leftover ground beef and the leftover pulled beef.

If you have fresh jalapenos, use them. Mine were moldy (gross) so I used leftover canned jalapenos from our tacos salad bar. This is about 1/2 cup.
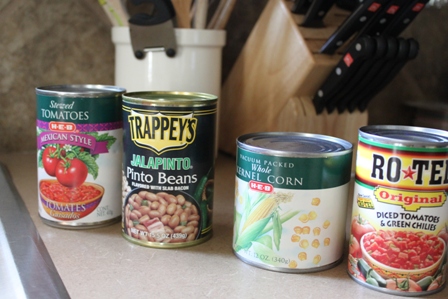
The can goods I added were Stewed Tomatoes (the mexican flavored variety), Trappey's Pinto Beans (bacon flavored), a can of Kernell Corn and a can of Rotel.

I had a few fresh ingredients (that were not moldy yet,) I shredded a carrot into a saute pan over medium heat.

Next I added three celery stalks that I sliced and added 1 tablespoon of minced garlic, and 1 tablespoon of olive oil. Because I didn't plan on cooking this Taco Stoup in the crock pot all day I wanted to give these fresh veggies a head start by sauteing them for about 4 minutes before adding them to the rest of the ingredients in the crock pot.

Following my original recipe, I add one package of Taco Seasoning and one package of Ranch Salad Dressing.
I stirred all my ingredients together and added two cans of water. Set the crock pot to high and let it cook, stirring every so often for as long as you can stand it. If you have all day, then set to low and let it cook for 8 hours. I'm probably going to eat this in one to two hours. All my ingredients are cooked, I just want to heat through and let the ingredients marry and fall in love.
In place of two cans of water, use chicken broth or beef broth if you have it. And that is how I made Taco Soup using leftover ingredients. Be bold and brave in the kitchen, you just might surprise yourself!
Sunday, December 19, 2010
Shrimp Enchiladas


Tortillas: I used flour tortillas because that is Jim's preference. I personally like corn tortillas for their distinct flavor and texture but I agree with Jim that corn tortillas always seem to fall apart after you add the enchilada sauce and flour tortillas seem to hold up better.
Filling: I used a combination of shrimp, chives, cream cheese, prepared verde salsa and avocado. Don't let my list limit you though. A lot of the seafood enchilada recipes I looked at online had a combination of shrimp and crab with some sort of binding like cheese or sour cream. If available, crawfish tails, often sold already cooked, would be fantastic here.
Sauce: I like to put sauce on top of my enchiladas before baking. Some people like to add sauce after the fact, it's all up to you. A jarred verde salsa could be used as a topping with a sprinkling of cojita cheese to add an authentic flavor. I really wanted an ooey gooey sauce so I made my own with butter, flour, cream, fontina cheese and some seasonings.
Let me show you what I did...


Some research online led me to this list of classic sauces all made from the basic Béchamel sauce with additional ingredients added:
Mornay sauce (cheese)
Nantua sauce (crayfish, butter and cream)
Crème sauce (heavy cream)
Mustard sauce (prepared mustard seed)
Soubise sauce (finely diced onions that have been sweated in butter)
Cheddar cheese sauce (Cheddar cheese, dry mustard, Worcestershire sauce)
Croque Monsieur (some variations)
The term "white sauce" or sauce blanche may also be applied to a simple sauce consisting only of milk and melted butter, without flour or spices.
A sweetened béchamel flavoured with rum, brandy or spices is a traditional accompaniment to steamed pudding such as Christmas Pudding.
To make a bechamel sauce, you need butter, flour, milk and salt. To make about three cups of sauce, melt five tablespoons of butter in a medium saucepan over medium-low heat. Add four tablespoons of flour and stir with a whisk allowing it to heat and cook until the mixture turns a golden sandy color, about 5 to 6 minutes.
Meanwhile, heat four cups of milk in a separate pan until just about to boil. Add the hot milk to the butter mixture 1 cup at a time, whisking continuously until very smooth. Bring to a boil. Cook 10 minutes, stirring constantly, then remove from heat. Season with salt and set aside until ready to use.
So now that you know how to make a bechamel sauce, let me show you what I did to make my Shrimp Enchilada Sauce!


I also added a small can of green chiles.


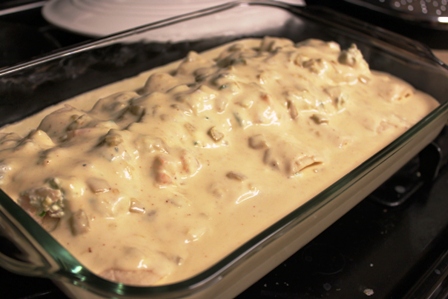

Topped with fresh cilantro.

YUM! These didn't last long in my house. They were meaty and full of flavor but the best part was the ooey gooey cheesy sauce.
Friday, September 24, 2010
Spicy Sausage over Rice


I used leftover spanish rice as my base which was great because it was already seasoned, but if I didn't have this in the fridge ready to go I could have used another starch like grits, mashed potatoes, white rice, egg noodles or other pasta. We had three brats, butter, diced ham, tomatoes, a carrot, some chives and not pictures are white wine and some seasoning I added while cooking.

I started with a tablespoon of butter in a medium saucepan over medium heat. When the butter melted I added one chopped carrot and 1/4 cup of diced ham. Other veggies that would work great here are celery, garlic (not sure why I didn't think to add garlic to this, I know I had it on hand.)

After a few minutes, I added about a cup of white wine and the chopped tomatoes and let this simmer down until almost all the liquid was gone.

I took the sausage out of the casings and dropped them into a small skillet to brown the sausage balls.

Once browned, but not fully cooked through I added the sausage balls to the tomato sauce.
 .
I tasted and adjusted seasoning by adding a dash of ground mustard, garlic powder and red pepper flakes.

I added a lid and let this cook down until the sauce was thick and the sausage was cooked through.

Done!

And the other two brats? Jim grilled them and ate them on a bun. (boring)

I liked my version of these brats much better. Spoon the sausage and tomatoes on top of the leftover spanish rice and finish off with a sprinkling of green onions and voila, a delish meal made from odds and ends. I love cooking!
Thursday, August 12, 2010
Steak Salad with Cilantro Vinaigrette

For a quick and yummy weeknight dinner, I made this beautiful dinner salad in under 20 minutes. I actually had leftover steak, but not enough for a meal - so I heated it up and sliced into thin strips and then divided among our two plates. Leftover beef fajitas would work really well here - any cut of leftover beef could be used.

What makes this salad work is the herby and flavorful dressing on the steak. I was fortunate to find some great products in my pantry but be bold and use substitutions in your own recipe. For this vinaigrette I needed a vinegar, an oil, an onion/shallot and an herb. I chose a roasted garlic grapeseed oil from Cambria winery, a champagne vinegar from B.R. Cohn winery, a shallot and a handful of fresh cilantro.

Using my Cuisinart blender I chopped the shallot and a handful of cilantro and with the motor running I poured in two tablespoons of garlic grapeseed oil and two tablespoons of champagne vinegar.

Taste and adjust your proportions to your liking. Maybe you want more vinegar, maybe it needs a squeeze of lemon or a clove of garlic or a dash of salt and pepper. Make the dressing first, and then set it aside in the fridge while you throw the rest of the dinner salad together. This reminds me of the time I made chimichurri sauce, but I like the bright tang of this concoction better.

To complete the meal, I used a mix of baby spinach and spring lettuce and lightly tossed the greens in extra virgin olive oil, salt and pepper. Then topped the dressed greens with my warm sliced steak, sprinkled with feta cheese crumbles and spooned my vinaigrette over the meat. Slice an avocado and serve on the side of the plate. If you have candied pecans or toasted pine nuts, those would be great on this salad. Dinner is served (in 20 minutes from start to finish.)
Thursday, July 29, 2010
Are these leftovers still good to eat?
Jim often asks, “Are the leftovers from (whenever) still good?” My usual response is to sniff it and taste it. If I don’t see mold and it doesn’t smell funky I say it’s safe to eat – but is that the right response? If cheese looks and smells fine I don’t have a problem with it being in the fridge for a month – or longer, and even when mold does appear I cut it off before Jim sees it. I do the same thing with his bread – just pinch the mold off before making him a sandwich with the last two slices of (moldy) bread. Am I slowly killing my husband?
Is yogurt still safe after the sell by date? How long can you keep thawed ground beef?
I get asked these questions all the time and I don’t always know the answer, but I was on blogher.com and they pointed me towards a terrific site that can tell you whether to keep or toss an item: Still Tasty has a database of thousands of food items that you can browse the shelf life of, and they also feature an FAQ section that I found invaluable last week when I cleaned out the pantry and fridge. I’d like to add that Still Tasty has no idea who I am, I’m sharing the link to their site simply because it’s a new discovery of mine that will really help me out and I want to share it with you also.

Our pantry BEFORE.
When I say we cleaned out the pantry and fridge, I mean that we gave the kitchen an overhaul starting with emptying the cupboards, cleaning, organizing and re-arranging. This included our completely disorganized and stuffed PANTRY and the FRIDGE that may have housed hazardous material. With Jim’s help we pulled the contents of the pantry out on the kitchen table, shelf by shelf. We checked all the dates, referenced Still Tasty, and tossed quite a few items. Some things were no brainers, like granola bars dating back to 2007.

Our (new and improved) pantry AFTER.
The result is an organized pantry that has easy to access items grouped logically on my shelves. Even better, I was able to refresh my memory on WHAT was in the pantry. Instead of buying ANOTHER can of black beans at the grocery store, I now know that we have three. It was like finding money. As we tossed items, we made a list of what needed to be replaced. I thought we had plenty of crackers, but they were actually all stale. I would recommend doing this at least twice a year.

And the answers to your burning questions:
What do you do when you find yogurt in the back of your fridge and the sell-by date was a week ago? Eat it or toss it? Still Tasty says that yogurt that has been properly stored will generally remain safe for at least 7 to 10 days after the "sell-by" date on the package. They even reference the safety specialists at Clemson University’s Cooperative Extension. Bear in mind the temperature of your refrigerator must remain at or below 40° Fahrenheit at all times. If mold appears on yogurt, or if it develops an off odor, flavor or appearance, you should always discard it immediately.
If you thawed some ground beef in the fridge today, and your dinner plans change – what do you do with the meat? Still Tasty says you’ve got some breathing room. Ground beef that’s been defrosted in the fridge can be safely kept for an additional one to two days in the refrigerator before cooking, says the U.S. Department of Agriculture. And since you thawed the ground beef in the fridge, you can also safely refreeze it within that same time frame, says the USDA. None of this would apply, on the other hand, if you had thawed the ground beef in the microwave or in cold water. You should immediately cook meat thawed under either of those methods, advises the USDA, since it could easily warm up to the 40°F temperature at which harmful bacteria begins to multiply rapidly.
Subscribe to:
Posts (Atom)