Showing posts with label snack. Show all posts

Sunday, March 25, 2012

Girls Night Recipes

When my friends and I plan girls night, it always involves sinful snacking. If there were a night to fry something, this would be it. Lots of jokes (sometimes at my expense), lots of fried food, lots of wine, lots of chatter around the roar of a fire - no boys allowed. You won't find spicy chicken wings or philly cheese steaks anywhere near our buffet. Let me highlight some of our favorite snacks for girls night!

Fried zucchini slices, otherwise known as Zucca Chips are so perfect for girls night! For one, they are quick and easy. Secondly, these are delicious!

Be sure to buy at least one zucchini per person because they shrink up and we tend to eat these by the handfuls.

As soon as you pull them out of the fryer, allow them to drain on a paper towel and sprinkle with salt right away.

While we were at it, we also thinly sliced potatoes and fried them up as well.

Wednesday, August 17, 2011

Krispy Kale

I don't know what convinced me to give oven roasted kale a try. I honestly did NOT believe kale could be this addicting, but another food blogger compared them to salty chips...and who doesn't like salty chips? You too will be surprised at how easy and tasty these Krispy Kale chips are. With just three simple ingredients the kale will bake to a delish crackly snack.

First, wash and dry the kale leaves. Then tear or cut the thick stems off and chop long leaves into smaller pieces.

Make sure the kale is very dry, any water on the leaves may make them steam in the oven, leaving you with soggy, not crunchy kale. Drizzle on just a small amount of olive oil (1/2 teaspoon for this one tray) and massage the oil all over.

Then spread the kale out on a cookie sheet. You don't really even have to worry about the leaves overlapping because the kale will shrink in the oven. I simply sprinkled on some course sea salt, but you can certainly get creative and add whatever flavors you like. Minced garlic would be good as well as a cajun seasoning perhaps.

Bake in a 350 degree oven for 10-15 minutes. Check after five minutes and adjust your time if you need to in order to keep them from burning. These are great for people like me who like crunchy salty things. Krispy Kale is so much better for you than a bag of processed chips!

Now that they are baked until crisp, you can do so many things! Instead of standing over the cookie sheet and eating them all myself, next time I want to crumble these up and stir in with some popcorn to up the nutritional value. I love gourmet popcorn!

Here is what I found out about buying and storing Kale:
BUYING - Kale should have a fresh green colour with moist, crisp, unwilted leaves. Young, small-leaved specimens are more tender; bigger leaves are well suited for use in soups.
STORING - Keep in a plastic bag in the fridge. Kale becomes increasingly bitter and strongly flavoured the longer it is kept and so is best eaten soon after buying.

One of my readers sent me this awesome tip:
"I really enjoy reading your blog posts. Just wanted to share something I tried recently. I found that seasoned kale chips go really well with grilled fish. If you haven’t tried kale chips before, they are so simple to make. I like to season mine with either smoked sea salt or kosher, black pepper and a tiny bit of malt vinegar. When you bake them, the texture is almost like dried leaves. It is a great balance for a delicate fish and a healthy boost! I also like to fry cilantro leaves in browned butter. Not quite as healthy but soooooooo good."

Ahh! I love that pairing idea, and we've been on such a fish eating frenzy around here that this is a perfect new twist on "Fish and Chips." Get it? Thanks Jessica, keep the ideas coming!


Tuesday, December 14, 2010

Super Special Spicy Pickles

This is real time reporting, ya'll. Here are pictures of the prep work for some Super Special Spicy Pickles. They "cook" for four days so my next post will be photos of the finished product. I first had a taste of these pickles back in 2007 when my husband's friend Mike gave him a jar of this homemade treat.

Jim told me I had to try one of these pickles and I was amazed at how awesome they were. They are sweet and spicy and very addictive. Mike's mom would regularly make a large batch and then Mike would hand them out to his friends. I sent Mike an e-mail in 2007 to request the recipe and his mom was so gracious to share it with me. As awesome as these pickles are, I can't believe it has actually taken me three years to get around to making them.

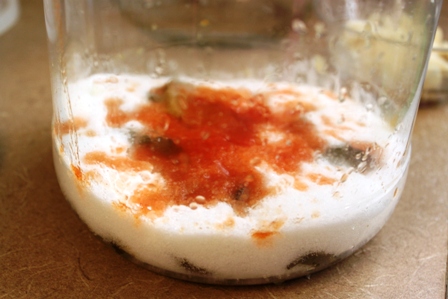
The recipe is super easy! You need one 4 pound bag of sugar, one 2 ounce bottle of tobasco sauce, one head of garlic and one gallon of sliced pickles.

The first thing you need to do is drain the jar of sliced pickles. I set a colander in the sink and dumped the jar of pickles in. Let this sit for at least an hour to drain.

Next, thinly slice an entire head of garlic.

To assemble, add a handful of pickles back to the jar and top with some garlic.


Top with sugar.
 Covering the previous layer completely.


Then top the sugar with some tobasco sauce.


 Keep layering: pickles, garlic, sugar, tobasco...

 Repeat until all the ingredients are gone.

Place the jar upside down in the fridge (on top of a plate in case there are any leaks.) Each day turn the jar until all the ingredients are mixed and the sugar is dissolved. Jim and I made this on Saturday, so this will be ready in four days....Part two is posted, see the finished product here.

Friday, October 8, 2010

Crunchy Chick Peas

Do you notice there are sometimes trends in the food blogging world? A recipe or food will be "in style" for a while and everyone makes it and posts about their version. I saw many crunchy chick pea recipes online a while back and bookmarked them to make sometime. I may be behind the curve posting these photos but you can get on the bandwagon too and whip these up in no time flat.

What appealed to me was that they were a healthy snack to satisfy that crunchy/salty addiction so many of us have. There are lots of recipes online for crunchy snacky chick peas, including one for Chickpeas with Thai Chiles from the Food section of the New York Times.

This is super easy to make. Start with one can of chick peas and pour into a colander and drain and rinse very well under running water.

Pat dry.

You’ll see that some of the beans have a thin skin on them…you can leave them on, or use the paper towel to rub them off.

Toss the chickpeas with the about 1 tablespoon of olive oil and spread out on a large cookie sheet. Roast at 400 degrees for 30-40 minutes or until brown and crispy. Turn and stir every ten minutes so they don't burn.


Take out of the oven and toss to taste with salt and spices.

The variations on spice combinations are endless. Here are some great flavor ideas I found online:
  • 1 tablespoon chunky sea salt and 2 teaspoons spice like garam masala
  • Sprinkled with Creole seasoning
  • 2 teaspoons chili powder, 1 1/2 teaspoons salt, 1 tablespoon lime juice
  • 2 tablespoons of dry ranch dip
  • 3 teaspoons soy sauce, 1 teaspoon Asian Sea Salt or sea salt
  • thyme, pepper and lemon zest

Wednesday, December 2, 2009

Chili Roasted Edamame

Edamame, pronounced "ěd'ə-mä'mā," is a preparation of baby soybeans in the pod commonly found in Japan, China, Hawaii and Korea, according to wikipedia. The pods are normally boiled in water together with salt and then served whole. To eat these, you pop the soybean out of the shell using your teeth and discard the pod, just eating the soybean.

Outside East Asia, the dish is most often found in Japanese restaurants and some Chinese restaurants, but has also found popularity elsewhere as a healthful food item.

The Japanese name literally means "twig bean" (eda = "twig" + mame = "bean"), and is a reference to the short stem attached to the pod. This term originally referred to young soybeans in general. Over time, however, the prevalence of the salt-boiled preparation meant that the term edamame now often refers specifically to this dish.

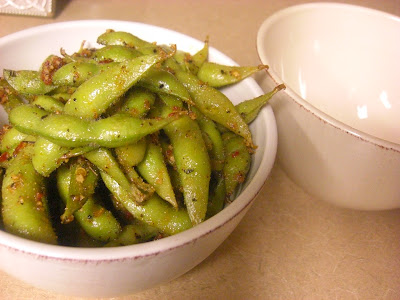
To make this spicy roasted edemame I mix minced garlic, red chili sauce, black pepper, celery salt, onion powder, dried basil and olive oil. The exact measurements are not that important, give it a taste test to check for spiciness.

Here is a general rule of thumb:
1 1/4 cups frozen shelled edamame (green soybeans), thawed
2 teaspoons olive oil
1/2 teaspoon chili powder
1/4 teaspoon dried basil
1/4 teaspoon onion powder
1/4 teaspoon ground cumin
1/8 teaspoon paprika
1/8 teaspoon ground black pepper


These soy beans were already cooked, they were purchased ready to eat in the produce section of my grocery store. After I combined the ingredients, I dumped the mixture on the pods that I spread out on a rimmed baking sheet.
With the oven pre-heated to 350, I tossed the soybean pods with the dressing.

Arrange the beans in a single layer and roast, uncovered, at 350 for 12 to 15 minutes, stirring once. Serve as a vegetable side dish or as a snack. Refrigerate any leftovers.

I like to steam soybeans when I get home from work, and munch on them while I cook dinner. They are a light and healthy nosh that keeps me from woofing down dinner when it is ready. This dressing really provides a KICK to my usual snack - it helps me get more water in for sure.

You can find these in several areas of most grocery stores. I've purchased them frozen in a bag in the freezer aisle, sometimes just the soybeans, and sometimes they are in the pods. You can also sometimes find these in the produce section where all the health-nut food is like tofu, etc.

I like to buy them in the pods, so it becomes an "activity" to eat these. I think of them like pistachios. If I sit down with already shelled pistachio nuts, I could probably eat two pounds in one sitting because they are so easy to pop in my mouth by the handful. If I buy the pistachio nuts that are in their shell, it becomes a little work to crack the shell and eat the nut - thus slowing me down a little.

Friday, November 14, 2008

Camping Snack

I've been traveling for work since Tuesday. That is three nights that Jim has had to feed himself. I wasn't worried though, I left plenty of meals for him to reheat, bread and deli meat, egg noodles. I knew he would survive without me.

But today... Oh, today I recieved a text message from Jim that said, "I miss your cooking." How completely sweet. I've managed to make him believe he can't go on without me. Ha! Success!

I drive home today and can't wait to sleep in my own bed, use my own toilet, do my own laundry (well, not that last part) but being home will be really nice.

On to the recipe. This is great weather in Texas to go camping. The leaves are just starting to change, but most everything is still green. Our days are a sunny 75 degrees with a cool breeze and our evenings cool off to around 50 degrees. My November gets really busy so there is no time for a weekend camping trip, but there is always time to make yourself a camping treat.


Here I grabbed some graham crackers, peanut butter and marshmallows.

Smear a little peanut butter on the graham crackers.

This right here would be a nice snack with some thin granny smith apple slices.

But today I'm placing a large marshmallow on top and placing under the broiler.

Don't walk off, these brown FAST.

It smells like we are camping again.

Quick and easy, these satisfy the craving I have for the wild outdoors...at least for a little while.

Tuesday, November 4, 2008

Spiced Popcorn Snack Mix

This recipe for Spiced Popcorn Snack Mix was first spotted in Rachael Ray’s magazine, but it wasn’t until I saw it on Aggie’s blog that I was convinced I had to make this popcorn for myself (and my friends). This will be the last recipe I post from the Fall Football Party, however. I’m sure ya’ll are getting sick of snack foods and ready to read some hearty meal recipes again. I have some GREAT stuff coming down the pipeline. How about Tempura Asparagus? Oh, this one will be good – go now and buy asparagus to get ready for that post! Also coming up I have Won Ton Soup, Black Olive and Red Pepper Risotto, Firecracker Shrimp, Oatmeal Cookies, Buttermilk Fried Chicken, T-Bone Steak with Baked Sweet Potato…I can’t wait for you to see these dishes!

But when you need a spiffed up snack mix, this popcorn was really easy to make and the flavors blend REALLY well together. I found myself picking out all the pumpkin seeds though, they were my favorite.

Here is what you need:
8 cups air-popped popcorn (I used three regular size bags of microwave popcorn which is too much – unless you increase the other ingredients)
1 cup roasted peanuts
1 cup pumpkin seeds, toasted
7 TB butter
1/4 cup dark brown sugar
1/2 tsp cayenne pepper (I would use more of this next time)
1 tsp cinnamon (I doubled this amount)
Salt and Pepper


I had two sheet pans of this popcorn. One would be better.


I purchased the roasted and salted pumpkin seeds, but you could certianly do this yourself.

Again, I purchased the roasted and unsalted peanuts, but you could toast these yourself too.

Butter into a hot pan.

Melt it.

Add brown sugar and WHISK! Whisk in the cayenne too until bubbling and thickened, 2 to 3 minutes.

Sprinkle the popcorn with peanuts and pumpkin seeds. Then pour the brown sugar all over the top of the popcorn. Toss to coat. Season with cinnamon, salt and pepper.
Bake at 200 degrees until toasted, 40 minutes. Let it cool completely. This was very well received. Thanks Aggie for giving me the push I needed to try this snack mix.