Showing posts with label Beverage. Show all posts

Tuesday, April 11, 2017

Honey Bourbon Toddy: Cough Syrup for Grown Ups


I came down with the cold of the century early this year. I was miserable and wanted to sip on something with healing properties that would also help me go to sleep. My cure was this seasonal mixture of booze, water, honey, citrus and spices, otherwise known as the Hot Toddy. It soothes, coddles, and makes everything right in your world - the equivalent of Mom.

In a microwavable mug I measure out 4 oz Water and 1-2 Tablespoons of fresh squeezed lemon. Microwave for one minute to get piping hot. Then I stir in in 1-2 Tablespoons of local honey and 2 oz of Bourbon (like Bulleit or TX Bourbon). I use a loose tea steeper to drop in 6 cloves and then stir with a cinnamon stick.

The warm adult beverage does the trick to calm my cough and help me sleep. Well, it's actually the honey that does the trick, I think. But the bourbon sure doesn't hurt.  Taking a full spoonful of honey has been shown to be very effective at calming nighttime coughs but it is not as fun as this adult cough remedy.

Thanks to the cold, I started liking bourbon and now I'm a whiskey girl. Who would have thought?!?!

Monday, July 23, 2012

New Seasonal Flavors of Dunkin' Donuts at Grocery + a Giveaway!


Coffee! The smell alone of it brewing early in the morning is enough to entice me out of my cozy bed. Jim is a simple man that knows what he likes, and he likes his coffee plain and black. He pours a cup and then is out the door. I take my time with my morning joe. I'm a "dessert first" kind of gal and like to sweeten my coffee with cream and sugar, maybe a sprinkle of cinnamon or a flavored syrup.

When I was asked to review two new flavors of Dunkin' Donuts at Grocery coffee, I jumped at the chance...especially after I found out what their Spring Seasonal Flavors are!


Continue Reading Post


Sunday, January 29, 2012

Morning Routines and a Dunkin' Donuts Coffee Giveaway


Sticking to a morning routine is essential for me. I've been out of college for ten years and one would think that I would have this morning thing down by now. When one wrench is thrown my way, I'm either late or probably forgot something and I'm for sure frazzled by the time I reach the office.

Here is my IDEAL morning routine:
  • 5:30 AM, Alarm goes off, I snooze for 10 minutes.
  • 5:40 AM, Jim calls from CA (it's 3:40 AM there and he's working a night shift).
  • 5:45 AM, Jim has talked me out of bed and my feet hit the floor.
  • 5:55 AM, I've managed to brush my teeth and put on workout clothes (yoga pants, t-shirt, sneakers, head band).
  • 6:00 AM, I'm out the door on my way to the gym (water bottle, protein bar, ipod, towel, chapstick).
  • 6:50 AM, Legs are tired, arms are exhausted, I'm sweaty and in need of a shower...bad!
  • 7:00 AM, Feed the dogs, (second) breakfast for me, shower, COFFEE, get ready for work.
  • 8:00 AM, *Out the door and headed to the office.


There are any number of things that can go wrong - starting with me turning my alarm OFF instead of snoozing and then ignoring the phone call from my husband, which never goes over very well.


Sunday, July 5, 2009

My Favorite Martini

I discovered my favorite martini at The Capital Grille in Houston, it is a vodka infused with pineapple. My dad was the one who asked for the recipe and began making this concoction at home. This quickly became a family favorite and often requested at our parties and gatherings.

I use one handle of Tito's vodka and two dole pineapples. Let me show you how to cut and dice a pineapple.

One of the most important things about this recipe is to choose a good pineapple. When shopping, choose a pineapple that has firm, gold to brown skin with green, loose leaves (not brown or wilted).

I was once told that fruit should smell like what it is. Duh. So a ripe pineapple will have a strong, fresh pineapple smell.

Tools: To peel the pineapple you will need a long knife. I use a long, serrated bread knife because it is slightly flexible making it easier to follow the contour of the pineapple.

With your knife, lop off the 1/2 inch of the top and bottom of the pineapple.

Turn the pineapple upright onto its base. Notice the dark brown "eyes" around the edge of the pineapple. Place your knife on top of the fruit just behind one of the eyes. The eyes run down the side of the pineapple in a column. Slice down to the bottom of the fruit slightly turning your knife at the top and bottom to follow the curved shape of the pineapple.

Cut off the rest of the pineapple skin by slicing down from top to bottom along each row of eyes (as revealed by your first cut). Your knife should be behind the eyes at approximately a 45 degree angle. Don't try to cut off too much of the peel at once or you will take a lot of good fruit with it.

I'm not too concerned with the little eyes on this pineapple because we are not eating or displaying the fruit. Now if you were going to display the infusion, then I would check the fruit over for any skin or eyes you may have missed. Remove any remaining eyes with a paring knife.

From here I slice the fruit in half, lay each half down on the flat side and slice it into wedges. Then turn 90 degrees and slice into chunks.

You will need a large AIRTIGHT container. Wash this really well with hot soapy water. Then start adding chunks of pineapple to the glass jar. I purchased this at the Container store for less than $20.

Woo Hoo, here is the fun part! Choose your favorite vodka, for me it is Tito's Handmade Vodka. It is produced right here in Austin at Texas' first and oldest legal distillery. Tito's is 100% corn and is made in small batches, distilled 6 times, is wheat free and gluten free.

Pour the entire handle of Tito's over the pineapple chunks, then lock down the air tight lid. Your vodka should cover all the fruit. If there is pineapple sticking out above the liquid, either add more vodka or remove some fruit.

The hard part is walking away. Just put this in the back of your fridge and try to forget about it. Let this infuse for as long as you can stand it...and I'm not talking about days. I'm talking MONTHS. I put this batch together in February, and then processed the pineapple for July 4th. TRUST me, it's worth it!

When you can no longer stand it, pull the Tito's Pineapple Infusion from the back of your fridge and strain all the liquid out. If you kept your Tito's handle, funnel the liquid back into the glass vodka container.


If you are dedicated like I am, then don your cute pink gloves (because the pineapples will eat up your hands). Either squeeze each piece of pineapple by hand or use a citrus juicer. I do this over a strainer and pitcher to catch the juice and separate any pulp.

This is tedious, but there is so much juice in these chunks, you shouldn't let it go to waste. I got another two cups of Tito's Pineapple liquid from squeezing these. This lovely concoction will keep in the fridge for a long time, although I don't think you need to worry about that too much - it will go fast!

Here is how you make my favorite martini. Fill a shaker with ice.

Pour the Tito's Pineapple Infusion over the ice in the shaker.

Shake it like a salt shaker! ...Or a Polaroid picture!

Strain into a martini glass.

This my friends is my favorite martini! You are literally drinking straight, chilled, Titos, but it is so smooth and sweetened with the pineapple...they go down SO EASY!

Cheers!

Thursday, April 30, 2009

Simply Perfect Lemonade

My precious baby Cole fishing his baseball out of the fountain. It was a hot day so I let him play in the water, but soon regreted that decision when he came over and shook right where I was sitting. Stinky dog quickly became wet stinky dog. Boys will be boys I guess. Speaking of boys, I had no idea how crazy happy Jim would be the day I made lemonade. It was one of those hot Texas days and I needed a sweet and tart beverage to quinch my thirst. Luckily, Elise had a post about perfect lemonade that I found online.

The secret to perfect lemonade is to start by making sugar syrup, also known as "simple syrup". Dissolving the sugar in hot water effectively disperses the sugar in the lemonade, instead of having the sugar sink to the bottom. This is also a great way to sweeten iced tea by the way.

1 1/2 c water
1 c sugar
1 c lemon juice

Make simple syrup by heating the sugar and water in a small saucepan until the sugar is dissolved completely. Add the lemon juice and the simple syrup to a pitcher. Add 3 to 4 cups of cold water, more or less to the desired strength. Refrigerate 30 to 40 minutes. If the lemonade is a little sweet for your taste, add a little more straight lemon juice to it. Serve with ice, sliced lemons. Serves 6.

I boiled 1 1/2 cups water and added one cup of granulated sugar. When sugar disolved, I removed from the burner and added one cup of lemon juice.

Then I poured this concentrated lemonade into a glass container and stored in the fridge.

To make the perfect glass of lemonade I added 1/2 cup of the concentrate, topped with ice and water. Voila, simply perfect lemonade. You would have thought I created cold fusion the way Jim flipped over this lemonade. It's the simple things in life!!

You know what could make this perfect glass of lemonade even better? Titos Vodka! Jenna, have you come up with a name for that concoction yet?

Here is another alternative! Make an Arnold Parmer, a great non-alcoholic cocktail. 50% lemonade and 50% iced tea.

Or better yet, freeze the lemonade in your ice cream maker or on a sheet pan like you were making a granita. Then, make iced tea and serve a scoop of lemonade on top.

Sunday, September 14, 2008

All About Ginger

A neighbor of mine invited me to join a local iron chef competition on Saturday. It would be a small gathering of friends who , like me, enjoy experimenting in the kitchen. The key ingredient – Ginger! I needed to find a recipe that could easily serve 10-12 people and that I could make ahead and bring to the party with me. After searching the internet, I narrowed my recipes down to two winners. Homemade Ginger Ale and White Chocolate and Ginger Ice Cream. I thought both were very clever and decided that I couldn’t choose just one – I resolved to bring a drink and dessert.

Homemade Ginger Ale
Ginger Water
1 cup peeled, finely chopped ginger (I did not peel the ginger, which probably is the reason my ginger water came out brown. No biggie)
2 cups water

Simple Syrup
1 cup sugar
1 cup water

Club soda
Lime juice
Lime wedges


Make Ginger Water
I started by boiling two cups of water and adding a cup of finely chopped ginger. Reduce to a simmer for 5 minutes then remove from heat and let it sit for 20 minutes and steep. Strain liquid through a fine mesh strainer. Discard ginger pieces.


Make Simple Syrup
This is so freaking easy, I don’t know why I don’t have a jar of this in my fridge at all times. You can use simple syrup not only to make cocktails, but sweeten tea, brush over cakes before frosting. All you do is boil a cup of water and then stir in an equal measure of sugar. Turn off heat and set aside to let it cool. Yup, it’s that easy. It will keep in the fridge for a while, although I bet you use it up quickly. I’m growing mint in my herb garden right now and looking forward to muddling my own mojitos with this simple syrup and some rum. Anyways, back to my Ginger Ale.

Make the Beverage
Mix ½ cup of ginger water with 1/3 cup of simple syrup and ½ cup of club soda. Add a squeeze of lime and serve in a tall glass.


This was a great and refreshing beverage. I though if it taste good now then I bet it would be BETTER with a little rum.

Yes, this makes it taste like a ginger mojito! I searched the web and found these other very interesting takes on a ginger mojito.

Batter-Splattered: Blueberry Ginger Mojitos, kill two birds with one stone by brilliantly making your simple syrup taste like ginger.
Chilefire’s Lemongrass and Ginger infused Frozen Mojito, this sounds like more work than what I did today but I bet the pay off is worth it. Yum!

------------------------------------------------------------------


Now for my next trick, I will be making homemade White Chocolate and Fresh Ginger Ice Cream from David Lebovitz who wrote the book “The Perfect Scoop; Ice Creams, Sorbets, Granitas, and Sweet Accompaniments.” So he’s basically king of homemade ice cream. I got this recipe from THE BEST ya’ll.

White Chocolate and Fresh Ginger Ice Cream
3-inch piece fresh ginger
2/3 cup sugar
1 cup milk
2 cups heavy cream
8 ounces white chocolate, chopped
5 large egg yolks


Slice the ginger thin, cover it with water in a medium saucepan, bring to a boil, and cook for 2 minutes. Drain away the water but return the blanched ginger to the pan.

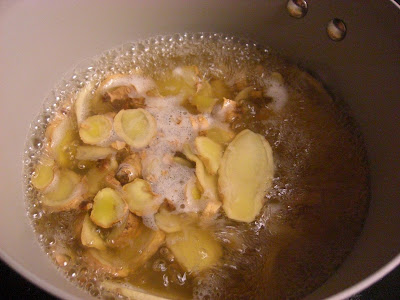

Add the sugar, the milk and 1 cup of heavy cream to the saucepan and re-warm the mixture.

Cover and steep for at least an hour, or until you are satisfied with the ginger flavor.
An hour was plenty for me. I was in a hurry to get this made and in the ice cream maker so it would have time to sit in the freezer and thicken up before the 7 PM Challenge… I mean, 7 PM Party.

In a separate bowl, whisk together the egg yolks, then gradually add some of the ginger-infused cream mixture, whisking constantly as you pour in the warm cream. This is to temper the eggs.
Pour the warmed egg yolks back into the saucepan and stir stir stir until you think your hand is going to fall off.

Cook over low heat, stirring constantly (I can only stir with my right hand, my left hand doesn’t do a very good job) and scraping the bottom with a heat-resistant spatula until the custard thickens enough to coat the spatula. This took me 15-20 minutes which I think is the longest I’ve ever had to do this. I wonder if the ginger pieces in the mixture kept it from thickening. Not sure. But keep stirring until it is thick.
Next, strain the custard into a bowl of chopped white chocolate, and stir until the chocolate is completely melted.

Discard the ginger. Add the remaining 1 cup of heavy cream and chill thoroughly. I set the bowl over an ice bath to speed it up.
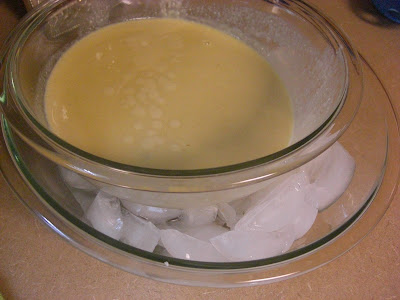
Chill mixture thoroughly, then freeze in your ice cream maker according to the manufacturer's instructions. Even after the ice cream maker is through, you need to dump into a container and put it back in the freezer for a few hours, or overnight if you can, so the ice cream firms up.
I am serving this tonight with a piece of candied ginger on top. PRECIOUS!

The party at Jen and Daves was a huge success and we tasted some really delicious recipes made with ginger. I’ve asked everyone to send me their recipes and I will post them here on my blog. Here are photos of the various dishes.


------------------------------------------------------------------
And the winning dish was this Pan-Seared Tuna with Ginger-Shitake Cream Sauce made by Dave.
6 6-ounce tuna steaks, each about 1 inch thick
2 tablespoons peanut oil
3 tablespoons butter
1/3 cup thinly sliced green onions
1/4 cup chopped cilantro
2 tablespoons finely chopped peeled fresh ginger
4 garlic cloves, chopped
8 ounces fresh shiitake mushrooms, stemmed, caps sliced
6 tablespoons soy sauce
1 1/2 cups whipping cream
3 tablespoons fresh lime juice
Lime wedges (optional)
Fresh cilantro sprigs (optional)

Preheat oven to 200°F. Sprinkle 1 side of tuna steaks with pepper. Heat 2 tablespoons oil in heavy large skillet over high heat. Place tuna steaks, pepper side down, in hot oil and sear 2 minutes. Turn tuna over and continue cooking to desired doneness, about 2 minutes for rare.

Transfer tuna to rimmed baking sheet; keep warm in oven.

Add butter, sliced green onions, cilantro, ginger and chopped garlic to same skillet and sauté until fragrant, about 30 seconds. Mix in mushrooms and soy sauce and simmer 30 seconds. Add whipping cream and simmer until sauce lightly coats back of spoon, about 3 minutes. Stir in lime juice. Spoon sauce onto plates; arrange tuna atop sauce. Garnish with lime wedges and cilantro sprigs, if desired.
Read original recipe online here at Epicurious. Stay tuned for more of these excellent Ginger recipes from the September Iron Chef Austin Challenge.